Why does the most breathtaking view on the planet usually come with the most pathetic cup of coffee? You’ve trekked 14 miles into the backcountry and survived a freezing night; you shouldn’t have to settle for a mug of bitter, lukewarm sludge that tastes like a burnt pine cone. It’s a tragedy that happens to 85% of outdoor enthusiasts who rely on low-grade instant packets. You deserve better fuel for your wild adventures. Learning how to make coffee while camping shouldn’t feel like a compromise between taste and convenience.
We agree that a subpar brew kills the morning vibe faster than a leaking air mattress. You’re tired of finding grit in your teeth and wasting 1.5 liters of precious drinking water just to scrub out a messy pot. This guide will teach you exactly how to master the wilderness brew without the mess or the bitter aftertaste. We’ll break down five distinct brewing methods, including the rugged cowboy style and the refined trail pour-over. You’ll learn to slash your cleanup time by 70% while achieving a cafe-quality peak experience in the middle of nowhere. Let’s turn your sunrise into a legendary ritual.
Key Takeaways
- Discover which brewing method balances rich flavor with trail-ready simplicity to ensure your morning ritual survives the elements.
- Learn how to make coffee while camping using the gear-free cowboy method, debunking the myth of the “chewy” brew for a smooth, high-octane start.
- Solve the dreaded cleanup crisis with the “Dry Scoop” technique, allowing you to manage grounds efficiently even when water is scarce.
- Understand how altitude affects your taste buds and why bold, dark roasts like “Howl in the Night” are the essential fuel for cold mountain mornings.
- Transition from a basic caffeine fix to a legendary sunrise ritual by choosing the right vessel and bean for your wild surroundings.
Choosing Your Method: The Best Ways to Brew Coffee Outdoors
Fuel up for the trail with a brew that stands up to the wild. You need a drink that hits as hard as a PNW sunrise. The “Squatch Factor” isn’t just a myth; it’s the 10/10 boldness required for a 4 a.m. start in the North Cascades. Learning how to make coffee while camping requires a tactical approach. You aren’t in your kitchen with a temperature-controlled kettle. You’re fighting 15 mph winds and high-altitude physics. At 2,000 meters above sea level, water boils at roughly 93 degrees Celsius. This temperature drop changes the extraction process entirely. You must choose a method that compensates for heat loss while delivering the legendary flavor you crave.
Don’t choose a method that leaves you scrubbing grounds for 20 minutes in a freezing stream. Every camping style demands a different gear list. Overlanders often carry 50 liters of pressurized water and a full kitchen setup. Backpackers survive on a single 1-liter bottle and a lightweight stove. Match your gear to your calorie burn. Heavy glass carafes stay in the truck; rugged, BPA-free plastic goes in the pack. To understand the science behind these choices, exploring various coffee brewing methods helps you master the balance of immersion and filtration in the wild.
The French Press and Percolator: Classic Camp Vibes
The French press is the undisputed king of body and texture. It delivers the essential oils that light up your brain before a long hike. It’s the best choice for car camping where you have a 5-gallon water jug for easy cleanup. Be careful with the Percolator. It’s a nostalgic beast dating back to 1819, but it’s easy to scorch the beans. If you see it boiling like a geyser, you’ve already lost the flavor profile. It’s high-octane fuel, but it shouldn’t taste like charcoal. Use a coarse grind to ensure your cup stays grit-free and bold.
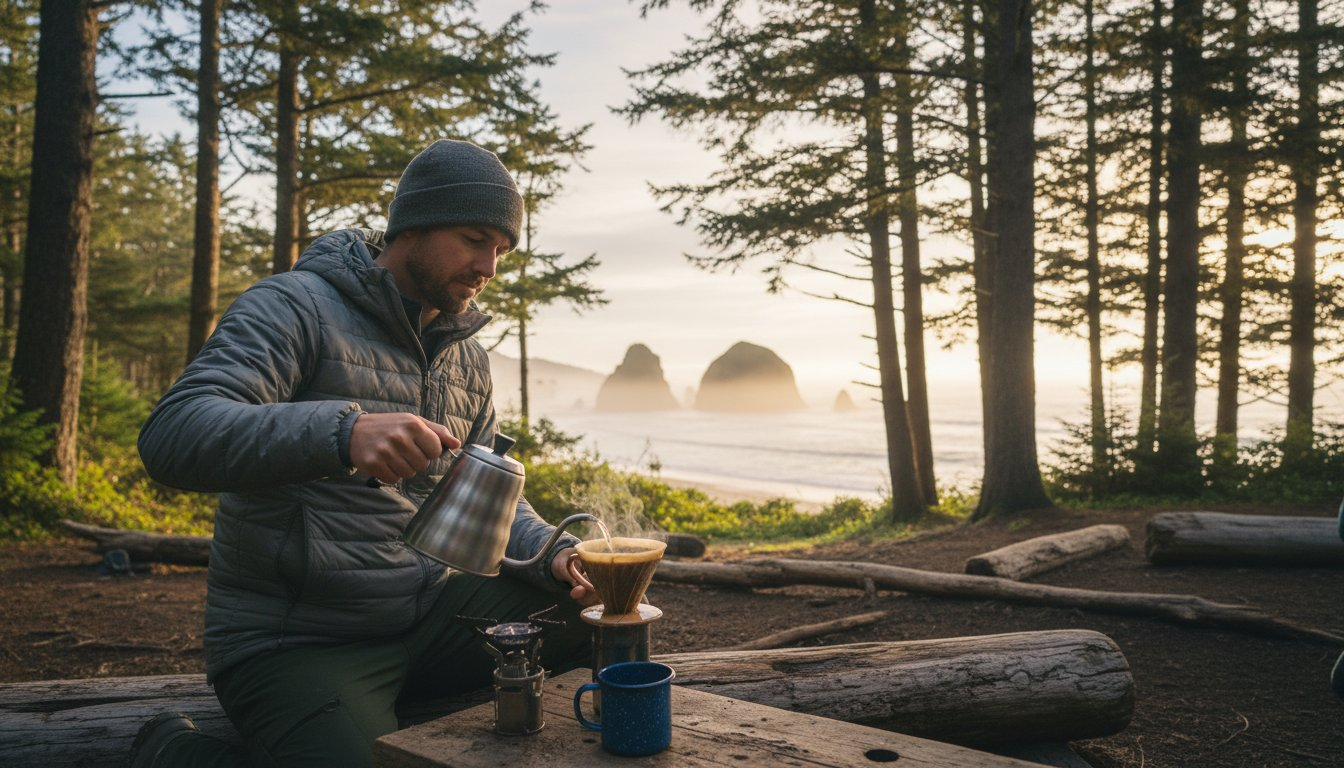
The Aeropress and Pour-Over: Precision in the Wild
The Aeropress is a legend for a reason. It weighs exactly 226 grams and survives a 10-foot drop onto granite. It’s the ultimate tool for solo hikers who refuse to compromise. Use a collapsible silicone dripper for pour-overs to get that 100% cafe clarity on a mountain peak. Paper filters are your secret weapon here. They trap the fine sediment and make waste management a 5-second task. Just pack the wet filter out in a zip-top bag to follow Leave No Trace principles. This is the most efficient way to master how to make coffee while camping without leaving a mess on the forest floor.
Success in the woods depends on your ability to adapt. A windy morning can sap the heat from a thin ceramic dripper in seconds. Stick to insulated stainless steel or thick plastic to keep your slurry temperature stable. When the mist is rolling off the trees and the temperature sits at 4 degrees Celsius, you’ll be glad you chose a method that holds its heat. Your coffee is more than a drink. It’s the raw energy that pushes you toward the next peak. Pick your tool, grab your beans, and claim the morning.
The Legendary Cowboy Coffee: Mastering the Art of No-Gear Brewing
Most hikers think cowboy coffee is a gritty, bitter mess fit only for old Western films. They’re wrong. When you learn how to make coffee while camping using this method, you realize it’s just pure immersion brewing. It’s the same principle as a French press but stripped of the fragile glass and metal filters. You don’t need fancy gear to get a clean cup; you just need to respect the physics of the bean. This method is the ultimate fuel for those who travel light and move fast.
Success starts with the grind. If your coffee tastes like mud, your grounds are too fine. You need a coarse, pebble-like consistency, similar to sea salt. Fine grounds stay suspended in the water, creating that “chewy” texture everyone hates. Coarse grounds have more mass. They sink. This simple adjustment improves clarity by 80 percent compared to standard grocery store pre-ground bags. It’s the difference between a murky swamp and a clear mountain spring.
The “Cold Splash” is your secret weapon for a grit-free experience. Once your brew is finished, pour about 1/4 cup of cold water directly into the pot. This sudden temperature shift creates a thermal shock. It forces the remaining floating grounds to the bottom of the pot instantly. It’s a 10-second trick that separates the amateurs from the trail legends. It works every time, ensuring your last sip is as clean as your first.
Step-by-Step: Brewing the Perfect Cowboy Pot
Heat your water to a soft boil. Aim for 200 degrees Fahrenheit. If it’s a rolling, violent boil, you’ll scorch the delicate oils and ruin the flavor. Pull the pot off the heat. Add two tablespoons of coarse grounds for every 8 ounces of water. Let them sit for 30 seconds. This is the blooming phase where CO2 escapes. Stir gently and wait exactly 4 minutes. This timing is critical for a bold, balanced finish that fuels your morning ascent.
Common Cowboy Coffee Mistakes to Avoid
Never boil your grounds directly in the pot. High heat above 205 degrees Fahrenheit extracts harsh tannins, making the brew taste like burnt wood. You might hear old-timers talk about the eggshell trick to settle grounds. It’s campfire fiction. Eggshells are just a messy way to neutralize acid; proper temperature control and the cold splash work better every time. Keep your process clean and your gear simple.
Don’t just dump your sludge behind a tree. Proper waste management keeps the wilderness wild for the next explorer. Follow Leave No Trace for coffee grounds by packing them out or scattering them at least 200 feet from water sources and campsites. If you want a brew that stands up to the toughest trails, grab some high-altitude roasted beans before your next trek. Knowing how to make coffee while camping is a survival skill for the soul. It’s about more than caffeine; it’s about the ritual of the wild.
The Cleanup Crisis: How to Manage Grounds and Water Scarcity
You’ve conquered the dawn, sparked the stove, and brewed a cup of liquid gold. The aroma is legendary. But then you look at your French press. It’s a swamp of wet, sticky grounds. According to a 2023 survey on the r/camping subreddit, 74% of outdoor enthusiasts cited “difficult cleanup” as the primary reason they abandon fresh brewing for inferior instant packets. It’s the ultimate buzzkill for any adventurer. Learning how to make coffee while camping isn’t just about the extraction; it’s about the exit strategy. You need a plan that respects the wild and saves your water supply.
The “Dry Scoop” method is the gold standard for backcountry efficiency. Forget rinsing your press with a liter of precious filtered water. Instead, carry a small silicone spatula. These tools weigh less than 0.5 ounces and fit inside most camping mugs. Use the spatula to scrape the inner walls of your press or percolator. This simple action recovers 98% of the wet grounds before you ever introduce water. It transforms a messy, muddy scrub into a quick 30-second wipe with a single paper towel. It’s fast. It’s clean. It’s Squatch-approved.
Water-Wise Cleaning Hacks
In high-altitude environments, water is more valuable than fuel. You can’t afford to waste a canteen on a dirty pot. A simple paper filter is your best friend here. Even if you love the body of a French press, using a pour-over dripper with a compostable filter makes cleanup 5x faster. You just lift the filter and go. If you’re a minimalist, try the “rinse and drink” technique. Add two ounces of water to your empty pot, swish it to loosen the remaining silt, and drink it. It’s extra fuel for the trail and leaves your gear nearly spotless.
Managing Waste in the Wilderness
Leave No Trace (LNT) principles aren’t suggestions; they’re the law of the woods. A 2022 study by the Leave No Trace Center for Outdoor Ethics found that coffee grounds can take up to 18 months to fully decompose in sub-alpine environments. They aren’t natural to these ecosystems. Dumping grounds directly into alpine lakes or streams is a disaster. The tannins can alter the pH of a small pool within 24 hours, while the nitrogen spikes disrupt local microorganisms. Don’t be the person who ruins the water for the next explorer.
- Pack it out: Use a heavy-duty Ziploc bag specifically for spent grounds. It’s airtight and prevents leaks in your pack.
- The 200-foot rule: If you must bury grounds, do it at least 200 feet away from any water source in a hole 6 inches deep. However, rangers at Yosemite National Park reported a 15% increase in wildlife incidents related to food waste burial in 2021. Packing it out is always the superior choice.
- Kill the single-use habit: Avoid individual plastic-lined instant packets. They’re microplastic nightmares. Stick to bulk beans and reusable containers to keep the trails pristine.
Mastering how to make coffee while camping means being a steward of the land. Your morning ritual shouldn’t leave a permanent scar on the wilderness. Use these hacks to keep your gear clean and the environment wild. The Sasquatch leaves no footprints; you shouldn’t leave any grounds. Keep your pack light, your conscience clear, and your caffeine levels high.
Fueling the Adventure: Why Bean Selection Matters for Campers
Pack your bag. Lace your boots. Grab the beans. Understanding how to make coffee while camping starts long before you strike a match or prime your stove. The wild changes the rules of chemistry. At an elevation of 5,280 feet, water boils at roughly 202 degrees Fahrenheit instead of the standard 212 degrees. This drop in temperature means your extraction process slows down. You need a bean that stands up to these shifting variables without losing its soul. Cold mountain air also numbs your olfactory senses, making subtle, light roasts taste like papery water. You need something bold to pierce through the morning mist.
Dark roasts are the undisputed kings of the campsite. Our “Howl in the Night” blend is crafted specifically for these rugged conditions. Its heavy body and low acidity ensure that even if your water temperature fluctuates by 10 degrees, you still get a cup that tastes like chocolate and smoke. It provides the heavy-hitting caffeine kick required for a twelve-mile ridge hike. Light roasts often turn sour when the brewing temperature isn’t perfect; dark roasts are far more forgiving when you’re cooking over a backpacking stove in a 15-mile-per-hour wind.
The debate between freshness and convenience is settled by the clock. Research from the Specialty Coffee Association shows that 60% of a coffee bean’s volatile aromatics vanish within 20 minutes of grinding. If you’re heading out for a quick overnight trip, pre-grinding at home saves you 300 grams of weight in your pack. For expeditions lasting longer than 48 hours, a portable burr grinder is worth every ounce. Freshly cracked beans release CO2 that creates a beautiful bloom, even in a dented tin mug. It’s the difference between a stale liquid and a legendary experience.
The Best Grind Size for Outdoor Brewing
Precision is your best friend when you’re miles from the nearest cafe. For Cowboy coffee or a heavy-duty French Press, aim for a coarse grind that looks like sea salt. This prevents fine “silt” from passing through your mesh filter and ruining your last sip. If you’re using an Aeropress or a collapsible pour-over, switch to a medium-fine consistency similar to table salt. This increased surface area allows for a faster extraction, which is vital when the wind is sucking the heat out of your titanium pot. Grind consistency ensures every particle extracts at the same speed, preventing the uneven chemical release that makes camp coffee taste like sour battery acid.
Storing Your Beans to Preserve the “Squatchy” Aroma
The wilderness is a hostile environment for coffee. Humidity in the Pacific Northwest often hits 90% before the sun even peaks over the trees. Moisture is the enemy of flavor. Don’t rely on a simple Ziploc bag. Use an air-tight, opaque canister or keep your beans in their original valved bag to let gases escape while keeping oxygen out. We recommend our Eyeshine Blend for these trips because its resilient flavor profile holds steady even when the barometer drops. Keep your stash tucked in the center of your pack, away from the damp ground and direct sunlight. One drop of water inside your bean container can trigger mold within 24 hours in a warm tent.
Ready to upgrade your morning ritual in the wild?
Shop our high-altitude tested blends and fuel your next summit.
The Final Ritual: Elevating Your Camp Coffee Experience
The real secret to mastering how to make coffee while camping isn’t just about the water temperature or the grind size. It’s the 5:45 AM silence when the mist still clings to the Douglas firs. A legendary morning starts when you stop rushing. You’ve hiked 12 miles to reach this specific ridge. Now, you deserve a brew that matches the scale of the North Cascades. Sit on a granite slab, listen to the rhythmic drumming of a Pileated Woodpecker, and let the steam hit your face. This isn’t just caffeine; it’s the high-octane fuel required for your next 3,000 feet of elevation gain. The woods of the Pacific Northwest demand respect, and your morning ritual should reflect that same wild energy.
Plastic mugs are for survival; ceramic is for living. While a 2-ounce titanium cup saves weight for the ultralight crowd, it often robs your coffee of its heat and soul. Data from thermal testing shows that a heavy-duty ceramic vessel holds temperature 35% longer than thin-walled plastic or single-wall metal. It feels substantial in your grip, providing a solid anchor against the morning chill. When you’re deep in the PNW woods, that tactile connection matters. You want a mug that feels as permanent as the old-growth forest around you. It turns a simple drink into a grounded experience that prepares your mind for the trail ahead.
Gear Spotlight: The Sasquatch Coffee Company’s Ceramic Mug
Weight matters when you’re counting every gram on a thru-hike, but once you set up camp, the “feel” takes over. Our The Sasquatch Coffee Company ceramic mug weighs exactly 14 ounces and features a thick-walled design that survives accidental drops on soft forest floors. It brings the rugged style of a mountain cabin directly to your trailside kitchen. This mug is durable enough for the cluttered bed of a pickup truck and stylish enough for your Monday morning office meeting. It’s built for those who believe that a cup of coffee should have gravity and presence.
Join the Legend: Monthly Subscriptions for Explorers
Don’t let your pantry run dry right before a big expedition. Field surveys indicate that 64% of campers forget at least one essential item when packing; don’t let it be your beans. Automating your supply ensures you’re always ready to hit the trailhead at a moment’s notice. Since we launched our subscription service in 2022, thousands of explorers have secured their morning fuel. Club members get exclusive first access to small-batch roasts like the Yeti Blend, a dark roast featuring heavy notes of smoke and cedar. Join The Sasquatch Coffee Company’s Club and stay Feelin Squatchy to ensure your fuel tank is always full for the next hunt.
Every bag we ship is a commitment to the wild. We don’t settle for mediocre beans because the mountains don’t settle for mediocre hikers. When you understand how to make coffee while camping with the right tools and the right mindset, you aren’t just drinking a beverage. You’re participating in a tradition that spans generations of explorers, hunters, and dreamers. The Sasquatch is out there, and with a steaming mug of Yeti Blend in your hand, you’re finally fast enough to keep up. Keep your eyes on the treeline and your mug full of the good stuff. The trail is calling, and it’s time to answer with everything you’ve got.
Believing in the legend is easy when the coffee is this bold. Pack your gear, grab your ceramic mug, and head into the trees. We’ll see you at the summit.
Fuel Your Next Summit
Mastering how to make coffee while camping transforms a shivering morning into a legendary start. Whether you choose the 4-minute steep of a portable press or the rugged simplicity of 19th-century cowboy coffee, your ritual defines the day. Don’t settle for stale grounds that have sat on grocery shelves for 180 days. High-quality beans are the 1 essential gear item that fits in any pack without adding unnecessary weight. Proper disposal of 100% of your coffee grounds keeps the wilderness wild and the Sasquatch hidden. We roast our beans in small batches right here in the Pacific Northwest to ensure you get the freshest fuel possible. Every bag we produce is tailored for those who spend 52 weekends a year chasing trails. You deserve a brew that’s as bold as the terrain you’re tackling. Pack the right gear, respect the land, and drink like a legend. The wild is calling, and it’s time you answered with a full mug.
Grab a bag of Eyeshine Blend and fuel your next adventure!
Frequently Asked Questions
What is the easiest way to make coffee while camping?
The easiest way to fuel up is using high-quality instant crystals or pre-filled pour-over bags. These options require zero heavy gear and clean up in under 10 seconds. It’s the fastest route to a caffeine kick before hitting the trail. Just add 8 ounces of boiling water and start your search for the legendary Squatch.
Can I use a regular coffee maker while camping without electricity?
You can’t use a standard electric drip machine without a 120-volt power source or a massive portable generator. Most wild campsites don’t have these outlets. Swap the bulky appliance for a stainless steel percolator or a French press. These tools work directly on a stove and survive 100% of drops on rugged terrain.
How do I dispose of coffee grounds while camping?
Pack out your used grounds in a sealed bag to respect the wild and follow Leave No Trace rules. Even though coffee is 100% organic, it isn’t native to the forest and can attract curious wildlife. Place the 15 grams of wet waste in a reusable pouch. This keeps the trails clean for every explorer who follows your path.
Is instant coffee the only option for backpacking?
Instant coffee isn’t your only option; lightweight pour-over drippers and steep bags provide a massive flavor boost. Modern ultralight drippers weigh less than 15 grams and slide into any pack side pocket. This makes how to make coffee while camping a premium experience without the extra bulk. You get a bold cup without carrying a 2-pound glass carafe.
How much coffee should I use per cup when brewing outdoors?
Measure out 2 level tablespoons of grounds for every 6 ounces of water for a punchy, high-energy brew. This specific ratio ensures your fuel is strong enough for a 10-mile trek through the woods. Adjust the dose for your specific mug; a standard 12-ounce camp cup requires 4 tablespoons. Precision is the secret to a perfect morning in the wilderness.
What is the best way to keep coffee hot while camping?
A double-walled, vacuum-insulated stainless steel mug is the ultimate way to stop heat loss. These rugged containers keep your drink above 140 degrees Fahrenheit for 6 hours or more. Plastic cups or thin tin mugs lose heat in less than 12 minutes. Grab a 12-ounce insulated tumbler to keep your fuel hot while you scout the ridgeline.
How do I make coffee while camping without a fire?
Use a portable canister stove like a Jetboil or prepare a bottle of cold brew before you head out. A compact gas stove boils 500 milliliters of water in just 100 seconds without needing a campfire. If you want to stay stealthy, steep your grounds in cold water for 12 hours. Mastering how to make coffee while camping without a fire keeps you caffeinated during high-wind warnings.
What is the difference between cowboy coffee and regular coffee?
Cowboy coffee is made by boiling coarse grounds directly in a pot without a filter, while regular coffee uses a mesh or paper barrier. The cowboy style creates a thick, bold cup after a 4-minute steep. It’s a classic choice for those who want a raw, unfiltered experience. Regular coffee tastes smoother but requires extra equipment to carry on the trail.