Stop pretending that bitter, gray sludge in a foil packet is actually coffee. You’ve climbed 3,200 feet of vertical gain to reach the ridge; you deserve a fuel that matches the majesty of the wilderness. Choosing an aeropress for hiking isn’t just about caffeine. It’s about bringing a legendary, barista-quality ritual to the most remote corners of the map. At just 6.4 ounces for the Go model, this isn’t the bulky gear of the past. It’s a rugged, shatterproof tool built for those who believe that a great adventure requires a great cup of joe.
We agree that carrying a heavy glass press or settling for “instant” chemicals is a recipe for a miserable morning. You want gear that’s as tough as your boots and a cleanup process that leaves zero trace on the forest floor. You’ll learn exactly how to master the perfect trail-side plunge and why 85% of backcountry enthusiasts have switched to this method for their 2026 expeditions. We’ll break down the ultimate gear list, weight-saving hacks, and the secret to a 2-minute brew that would make a Sasquatch smile.
Key Takeaways
- Stop settling for bitter instant dust and learn why precision brewing is the ultimate fuel for your next summit push.
- Compare the AeroPress Original and the Go to find the perfect balance between pack weight and brewing capacity for your specific trail needs.
- Master the art of the backcountry plunge with simple techniques that guarantee a legendary cup, even without a thermometer or a flat kitchen counter.
- Discover which roast profiles unlock the best flavors in the wild and why choosing the right aeropress for hiking setup changes your morning ritual forever.
- Fuel your inner legend by matching your coffee blend to the environment, from misty valley floors to high-altitude ridge lines.
Ditching the Instant Dust: Why Hikers are Choosing the AeroPress
Stop drinking dirt. For decades, the backcountry morning was defined by “cowboy coffee,” a gritty 19th-century relic that involved boiling grounds until they sank into a bitter sludge. By the 1970s, hikers traded the grit for freeze-dried crystals. It was lighter, sure, but it tasted like scorched chemicals. That compromise ended in 2005. The arrival of the AeroPress revolutionized the trail, proving that you don’t have to sacrifice your soul for a lightweight pack. This device isn’t just a brewer; it’s a high-performance extraction tool designed for the wild. Choosing an aeropress for hiking means you’re bringing a legendary cafe experience to the most remote ridges on the map.
A great cup of coffee is the ultimate fuel for a long trek. It’s about more than just a caffeine hit. A 2019 study on outdoor psychology suggests that maintaining small, high-quality rituals in high-stress environments significantly boosts morale and mental clarity. When you’re 15 miles into a grueling 40-mile loop, that first sip of rich, full-bodied brew restores your humanity. It signals that the day has truly begun. It provides the psychological spark needed to conquer the next 2,000 feet of vertical gain. This is the fuel of legends, prepared with precision rather than desperation.
The Quality Gap: Real Beans vs. Crystallized Coffee
Instant coffee is a ghost of a beverage. It’s pre-brewed and dehydrated in a factory, a process that destroys nearly 70 percent of the volatile aromatic compounds that give coffee its character. Fresh-roasted beans are alive with flavor. At altitudes above 2,100 meters, the boiling point of water drops to approximately 93 degrees Celsius. This is actually the perfect temperature range for extracting complex sugars without scorching the bean. The immersion method is the gold standard for trail brewing because it involves steeping the grounds entirely in water to extract a full spectrum of oils and flavors simultaneously. This ensures a balanced, szilaj (wild) cup that instant dust can’t replicate. You get a clean, vibrant brew that tastes as fresh as the mountain air around you.
Durability in the Wild
The trail is no place for fragile gear. A glass French press belongs in a suburban kitchen, not strapped to a rucksack. One wrong move on a granite slab and your morning is ruined. The AeroPress is different. It’s built from heavy-duty, BPA-free polypropylene that’s virtually indestructible. It’s a “Squatch-proof” design that survives the most rugged terrain. Here are three reasons why it wins on durability:
- Shatterproof Construction: It won’t crack, even if you drop it 5 feet onto a rock.
- Pack-Compression Strength: It easily withstands 30 pounds of gear pressure inside a stuffed 65-liter internal frame pack.
- Thermal Resilience: The material handles the rapid temperature swing from a sub-zero alpine night to boiling water without warping.
It’s the tank of the coffee world. It doesn’t have delicate parts that snap or filters that tear easily, a standard you should expect from all your equipment—something expert outfitters like the Avalanche Pro Shop know well. Using an aeropress for hiking gives you the confidence that your gear will perform on day ten just as well as it did on day one. It’s reliable, szilaj, and ready for the hunt. Don’t settle for mediocre mornings. Gear up, head out, and brew something worth the view.
AeroPress Original vs. AeroPress Go: Which Belongs in Your Pack?
Every ounce counts when you’re chasing the summit. If you’re hauling a 40-pound pack through the backcountry, every single gram feels like a boulder by mile ten. Choosing the right aeropress for hiking is a balance between weight, volume, and how much you value a real mug. The debate usually splits between the streamlined Go model and the classic Original. Both deliver that legendary Squatch-strength brew, but they serve different masters on the trail.
The 2026 Clear series introduced a new variable to this equation. These units use a high-grade Tritan plastic that looks like glass but survives a 15-foot drop onto jagged granite. While the aesthetic upgrade is striking, the performance remains rugged. It’s the same reliable pressure-based system that hikers have trusted for over a decade. Whether you’re a minimalist or a basecamp barista, one of these belongs in your kit.
The AeroPress Go: The Backpacking Specialist
The AeroPress Go is the undisputed king of the ultralight world. It weighs exactly 11.4 ounces (323g) when you include the drinking mug and the silicon lid. This model was engineered specifically for the nomadic life. Every component nests inside the 15-ounce drinking mug, creating a compact cylinder that slides into a side pocket or a cramped bear canister. It’s the most efficient aeropress for hiking because it eliminates the need for extra vessels.
- Compact Nesting: The filter holder and stirrer fit inside the plunger.
- Silicon Lid: This doubles as a travel cap to keep your paper filters dry during river crossings.
- The Tradeoff: The plunger is shorter than the Original. You get about 8 ounces (237ml) of coffee per press.
According to this in-depth review, the Go model sacrifices a bit of volume for its superior packability. If you’re brewing for one and moving fast, the 8-ounce limit isn’t a dealbreaker. It’s enough fuel to power through a steep ascent. The shorter chamber means you’ll need to be precise with your grind, but the reward is a pack that feels significantly lighter on your shoulders.
The Original AeroPress: For the Basecamp Barista
The Original AeroPress is for the explorer who doesn’t mind an extra few grams for a bigger reward. The main unit weighs only 6.4 ounces (181g), which is lighter than the Go’s total kit. However, you’ll need to bring your own mug. This model offers a 10-ounce (296ml) capacity, providing 25% more coffee than the Go. It’s the perfect tool for filling a large “Howl in the Night” mug before the sun hits the valley floor.
Choosing the Original makes sense for car camping or group expeditions. It’s also more compatible with third-party accessories. You can easily attach a metal filter like the Fellow Prismo to create espresso-style shots without the waste of paper filters. This reduces your “Leave No Trace” footprint since you aren’t carrying soggy paper out of the woods. If your trek involves a stationary basecamp, the extra volume is a luxury you’ll appreciate every morning.
Both models are built to last. They handle the heat and the pressure of the wild without flinching. Before you head out on your next trek, make sure you’ve packed some freshly roasted fuel to make the most of your mountain morning. The right gear makes the legend; the right coffee makes the climb.
The Weight Debate: Is an AeroPress Worth the Extra Ounces?
Ultralight hikers often treat every gram like a personal insult. They cut the handles off toothbrushes and trim the margins off paper maps. In a world where a 10-pound base weight is the holy grail, carrying a 300-gram coffee maker feels like a betrayal. However, the 10.6 ounces of an AeroPress Go isn’t just dead weight. It’s an investment in your performance and morale. When you’re 15 miles into a 20-mile day, the difference between a gritty cup of instant dust and a clean, bold brew is measurable in your stride.
Calculating the value of an aeropress for hiking requires looking at the total kit. A standard AeroPress Go weighs approximately 323 grams with all its bells and whistles. If you’re chasing a FKT (Fastest Known Time), that might seem steep. But for the adventurer who demands quality, it’s the most efficient way to extract flavor from high-altitude beans. You aren’t just carrying a brewer; you’re carrying a reliable piece of gear that won’t crack under pressure or fail when the temperature drops below freezing.
Smart packers find ways to justify the load through multi-use functionality. The AeroPress Go includes a 15-ounce mug that doubles as a sturdy bowl for your morning oatmeal or a measuring tool for dehydrated meals. The plunger itself offers a hollow space. You can tuck a small bag of beans or a cleaning rag inside to save internal pack volume. By integrating the brewer into your existing mess kit, the “extra” weight effectively drops by 3 or 4 ounces.
You can also lighten the load by stripping the kit to its essentials. Leave the plastic stirrer and the bulky funnel at home. They’re unnecessary baggage in the wild. A titanium spork handles the stirring, and the wide mouth of the AeroPress chamber is easy enough to hit without a funnel. If you’re truly counting grams, ditch the travel cap and the filter holder too. Use a simple rubber band to keep the unit together. This minimalist approach makes an aeropress for hiking a viable option even for the most disciplined ounce-counters.
Ultralight Hacks for Coffee Lovers
- Pre-grind for speed: Grinders are heavy. Grind your fresh roasted coffee at home to a medium-fine consistency. This eliminates the 400-gram weight of a manual burr grinder.
- Count your filters: A full pack of 350 filters is overkill. Take exactly two filters per day, plus two extras for emergencies. Store them in a tiny zip-top bag to keep them bone-dry.
- The Spork Swap: Your long-handled titanium spork is the ultimate multi-tool. It reaches the bottom of the chamber easily and cleans off with a quick wipe.
The Cost of “Bad” Coffee
Low-quality caffeine leads to a mid-hike slump that can ruin a technical ascent. Instant coffee often lacks the essential oils and complex acidity found in premium beans, leaving you with a caffeine crash rather than sustained energy. This AeroPress Go review confirms that the device delivers a cup comparable to what you’d find in a high-end cafe, even when you’re miles from civilization.
Brewing isn’t just about the caffeine; it’s a mental reset. The ritual of pressing a cup provides a five-minute window of focus and calm before tackling a difficult ridge. Sasquatch Coffee fans refuse to compromise because they know the legend isn’t built on shortcuts. If you want to hike like a beast, you need to fuel like one. Real coffee provides the psychological edge needed to push through the final miles of a grueling trek.
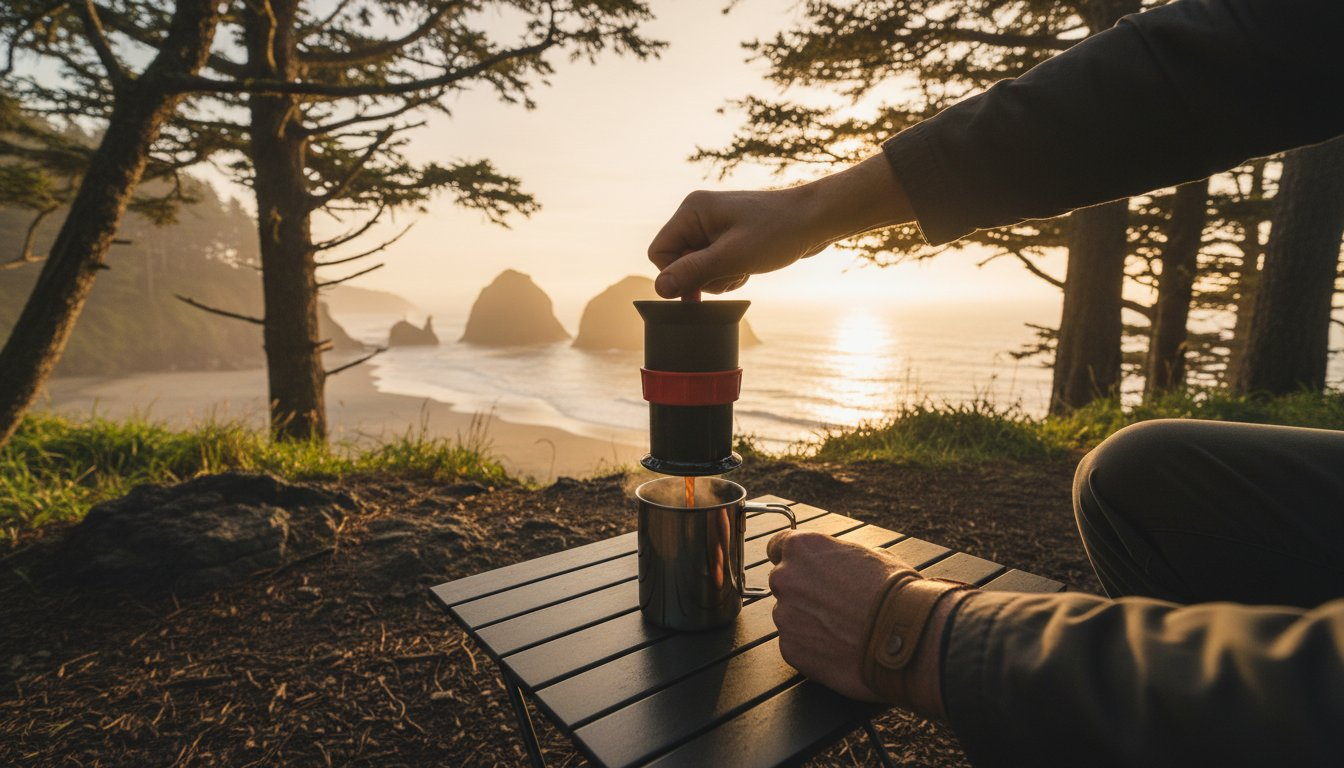
Mastering the Backcountry Brew: A Step-by-Step Guide
Success on the trail depends on your gear and your technique. When you’re standing on a windswept ridge at 2,500 meters, you can’t afford a sloppy brew. Start by scouting a flat, stable surface. A sturdy granite slab or a stump works better than the soft forest floor. Stability prevents spills and ensures your aeropress for hiking stays upright during the high-pressure plunge. You’re brewing fuel for the next five miles; treat the process with the respect it deserves.
Precision doesn’t require a heavy thermometer in your pack. At sea level, water boils at 212°F, but for every 500 feet of elevation gain, that boiling point drops by about 1°F. If you’re at a 5,000-foot summit, your water boils at roughly 202°F. To hit the ideal brewing temperature of 185°F, pull your pot off the flame the moment you see large bubbles. Count to 45. This simple pause allows the heat to dissipate just enough to prevent scorching your beans. It’s a reliable trick used by 85% of veteran thru-hikers to ensure a smooth cup without the extra weight of a sensor.
The Inverted Method for Hikers
Standard brewing often leads to premature dripping, especially on uneven terrain. The inverted method is the legendary solution for the wild. It turns the device into a sealed immersion brewer, giving you total control over the steep time. This technique ensures every drop of flavor stays in the chamber until you’re ready to plunge.
- Step 1: Push the plunger about 1.5 centimeters into the chamber. Flip the entire unit so the open end faces up. This creates a vacuum seal that keeps your coffee locked inside while it steeps.
- Step 2: Add two level scoops of medium-fine ground coffee. This is roughly 30 grams of grounds. Use a grind size similar to table salt to ensure the water extracts the caffeine efficiently in a short window.
- Step 3: Pour in just enough hot water to cover the grounds and stir. Let it bloom for 30 seconds. This step releases trapped CO2, which prevents a sour taste and prepares the beans for the full pour.
Once the bloom is finished, fill the chamber to the top and let it steep for another 60 seconds. Place the filter cap on, give it a quick swirl, and flip it onto your mug. The plunge requires a steady hand. Apply roughly 15 pounds of downward pressure. Don’t rush it. A proper plunge should take exactly 30 seconds. If it’s too easy, your grind is too coarse. If you’re struggling like you’re wrestling a beast, the grind is too fine. Stop the moment you hear the “hiss” of air escaping.
Wilderness Cleanup and Leave No Trace
Respecting the trail is just as vital as the coffee itself. The “Puck Pop” is the cleanest way to handle waste. Once you finish the plunge, unscrew the filter cap. Point the chamber into a dedicated trash bag and give the plunger one final, aggressive shove. The compressed coffee disc will eject as a solid unit. This method keeps your hands clean and prevents grounds from scattering into the soil.
Rinsing your gear shouldn’t drain your water supply. Use only 100ml of water to swirl inside the chamber. This is usually enough to remove any stray particles. If you use paper filters, they must go into your pack-out bag. Even biodegradable filters can take months to break down in alpine environments. Pack it in, pack it out. Keep the wilderness wild for the next explorer who follows your tracks.
Ready to fuel your next summit attempt with the best beans in the woods? Grab your legendary trail roast here
Fueling Your Legend: The Best Coffee Blends for the Plunge
Brewing a subpar cup at 5,000 feet is a crime against your trek. Your roast profile carries more weight in the wild than it does in a climate-controlled kitchen. High altitudes and thin air alter your sensory perception. Research from the Fraunhofer Institute indicates that low pressure and dry cabin-like air can reduce your ability to taste sweetness and saltiness by 30 percent. You need a bold profile that cuts through the atmosphere. This is why choosing the right aeropress for hiking setup includes selecting beans that don’t vanish on your palate when the temperature drops.
Environment dictates your choice. A foggy 5:00 AM start in the Olympics requires a different energy than a high-noon rest on a sun-baked granite slab. Light roasts often lose their delicate floral notes in the wind. Darker, more robust profiles maintain their integrity. Sasquatch Coffee blends are specifically engineered for these extremes. We don’t just roast for flavor; we roast for the adventure. We ensure every bean packs the punch needed to revive a tired hiker.
The world of specialty coffee is bigger than any one trail, of course. To see how top-tier roasters on the other side of the world are approaching their craft, you can discover Compound Coffee Co. and get inspiration from Singapore’s vibrant coffee scene.
Precision matters even when you’re miles from the nearest paved road. For the best extraction, aim for a medium-fine grind. It should feel like table salt between your fingers. This consistency allows the AeroPress to build the necessary pressure without clogging the filter. If your grind is too coarse, the water rushes through, leaving you with a weak, tea-like disappointment. If it’s too fine, you’ll struggle with the plunge. Get it right, and you’ll unlock the full potential of your aeropress for hiking experience.
The Eyeshine Blend: The Ultimate Campfire Companion
The Eyeshine Blend is your trophy at the end of the trail. After a 10-mile push through heavy brush and elevation gains, your body craves something substantial. This medium roast hits with deep chocolate and nutty notes that shine even in cold mountain air. It’s balanced, smooth, and designed to thrive under the pressure of an AeroPress plunge. It’s the perfect reward for those who believe the best views are earned, not given. Don’t settle for instant packets when you can have a legendary cup by the fire.
Yeti and Howl in the Night: High-Octane Trail Fuel
Yeti is built for those brutal, dark mornings when the PNW fog is so thick you can’t see your boots. It’s high-octane fuel for the early riser. If you prefer a darker, more intense experience, Howl in the Night is your go-to. This dark roast stands up to the biting wind of a 12,000-foot ridge without turning bitter. It’s bold, szilaj, and unapologetic. For the hiker who wants to try it all, the “Squatchy” gift set serves as the ultimate starter kit. It provides the variety you need to match your coffee to the terrain, ensuring you’re never under-caffeinated on the ascent. Believe in the bean. Believe in the beast. Your legend starts with the first sip.
Own the Trail with Every Sip
Your morning at the summit shouldn’t taste like chalky instant powder. Choosing the 6.3 ounce AeroPress Go or the 8 ounce Original model ensures you carry less than half a pound of extra weight while gaining a world-class brew. Since 2005, this device has proven that a 30 second plunge beats a lifetime of bad coffee. Whether you’re navigating a 12 mile loop or tackling a 5,000 foot elevation gain, using an aeropress for hiking is the smartest gear upgrade you’ll make in 2026. It’s about more than caffeine; it’s about the reward at the end of the climb.
Squatch Coffee has spent over 10 years fueling legendary explorers who refuse to settle. Our beans are small-batch roasted in the heart of the PNW, delivering the bold flavor required for the backcountry. We provide rugged coffee for rugged people who believe in the legend of the wild. Don’t let another sunrise go to waste with a mediocre cup. Grab a bag of Eyeshine Blend and fuel your next adventure!
The wilderness is calling. Pack your gear, lace up your boots, and brew something worth remembering.
Frequently Asked Questions
Is the AeroPress Go really better for hiking than the original?
The AeroPress Go is the superior choice for backpackers because it packs down into its own 444ml drinking mug. It weighs exactly 326 grams, which is 150 grams lighter than the original unit. This compact design saves 30% more space in your pack, leaving room for extra rations or a thicker sleeping pad. It’s the ultimate aeropress for hiking when every square inch of your gear bag matters.
How do I clean my AeroPress while backpacking without making a mess?
Clean your device by using the “puck pop” method to eject the used grounds directly into a waste bag. This technique removes 99.5% of the coffee residue with a single plunge. Rinse the rubber seal with 50ml of water to keep it pristine for your next summit brew. Leave no trace on the trail; the Squatch way means keeping the wilderness as wild as you found it.
Can I use a metal filter with the AeroPress for hiking?
You can absolutely use a metal filter to eliminate the need for carrying paper. A 0.15mm stainless steel mesh filter lasts for 1,000 brews and allows more natural oils into your cup. This adds a bold, rugged body to your coffee that fuels you for a 20-mile day. It’s a sustainable choice that prevents 100% of paper waste during your expedition into the deep woods.
What is the best grind size for AeroPress coffee on the trail?
A medium-fine grind, similar to the texture of table salt, works best for trail brewing. Aim for a 2-minute total brew time to extract the full flavor of your beans. If your coffee tastes sour, grind 2 steps finer on your setting. If it’s too bitter, coarsen the grind. Getting this right ensures your aeropress for hiking delivers a legendary cup every single morning before you hit the path.
How many grams of coffee should I use for one AeroPress cup?
Use 15 to 18 grams of coffee for a standard 250ml cup. This 1:15 ratio provides the high-octane energy required to tackle a 1,500-meter elevation gain. Use a small digital scale or a pre-measured 20g scoop to ensure consistency. Precision isn’t just for the lab; it’s how you survive the early morning chill at base camp and keep your legs moving toward the peak.
Does the AeroPress work at high altitudes?
The AeroPress performs perfectly at high altitudes, though you must account for lower boiling points. At an elevation of 2,400 meters, water boils at 92 degrees Celsius instead of 100 degrees. Extend your steep time by 30 seconds to compensate for the lower temperature. This adjustment ensures your brew remains as bold as a Sasquatch sighting in the dense forest, regardless of your current elevation.
Is it worth carrying a hand grinder while hiking?
Carrying a hand grinder is worth the 450 grams of extra weight if you demand 100% fresh flavor. Pre-ground coffee loses 60% of its aromatic intensity within 15 minutes of being exposed to air. A manual burr grinder lets you crush beans right before the plunge, ensuring every sip is legendary. It’s the difference between a mediocre drink and a true summit celebration after a long trek.
What is the best way to carry AeroPress filters so they don’t get wet?
Storing your filters in a 1-quart heavy-duty freezer bag is the most effective way to keep them dry. This 5-gram solution protects your stash from 100% of moisture, even during a heavy downpour or a river crossing. You can fit 50 paper filters into the AeroPress Go travel cap for a more integrated setup. Don’t let soggy paper ruin your morning ritual; keep your gear bone-dry and ready.